jueves, 30 de mayo de 2013
El rincón de Estela.: TORTA MULTIUSO
esta es la primera entrada del blog de mi mamá , como me encanta que se aventure en este mundo les comparto su primer post. El rincón de Estela.: TORTA MULTIUSO: INGREDIENTES 12 cucharadas de harina 9 cucharadas de azúcar 7 cucharadas de aceite (girasol, arroz o maíz) 1 huev...
Bolso o cartera en 30 minutos
Esta es una idea que surgió un día que mi niña tenia que ir a la casa de su abuela y no tenia un bolso que ella pudiera llevar con sus cosas pues los que tenia eran muy grandes y ella no podía llevarlos así que se me ocurrió esto transformar una remera que me gustaba mucho en un bolso.
El molde se los pasare mas adelante pues en realidad no use un molde solo realice un rectángulo y le deje las esquinas inferiores redondeadas.
Bueno acá les va el paso a paso super simple.


Bueno como ven es muy simple y de rápida confección se puede aplicar a mil tamaños distintos tanto para niños como para la compra ustedes decidirán el uso . Espero lo intenten y me envíen las fotos un abrazo.
El molde se los pasare mas adelante pues en realidad no use un molde solo realice un rectángulo y le deje las esquinas inferiores redondeadas.
Bueno acá les va el paso a paso super simple.
 |
| Aquí la remera y la sabana que utilice como forro. |
 |
| Primero vedemos planchar muy bien la remera en este caso lo hice con cuidado pues tiene pedrería y lentejuelas que dificultan el planchado. |
 |
| Una vez planchado tomamos la tijera y recortamos por las sisas y el escote dela manera que se ve en la foto.(la remera esta por el reverso para dejarla lista para coser) |
 |
| Esta es la forma que nos queda la parte superior sin las mangas y el cuello luego cortamos los costados si se requiere en este caso lo hice para darle la forma mas cuadrada. |
 |
| Enfrentamos derecho con derecho, y utilizamos como molde para cortar el forro cosemos laterales y fondo , lo mismo hacemos con el forro . Luego cortamos dos tiras que doblemos sobre si mismas 2 veces y las pespuntemos a modo de tiras para colgar (el largo es a gusto en este caso son unos 40cm por 9cm de ancho nos da un tira de 40 x 3 una vez cosidas) |
 |
| Asi queda una vez cosido el fondo y las tiras que se unen entre el forro y la tela de afuera una cinta para atar y listo . Pespunteamos el borde para darle una terminación. |
 |
| Aquí vemos el interior en el cual agregamos un rectángulo de 15 x 10cm cosido por 3 lados al forro formando de esta manera un bolsillo muy practico. |

 |
| este es el resultado final mi niña con su bolso lista para salir. |

 |
| como ven es justo de su tamaño y lo adora. |
martes, 28 de mayo de 2013
Ramo de novia de flores artificiales.


Elementos necesarios para el ramo. Alambre de floristería, alambre color oro, cintas de raso de varios colores, piedras de cristal de varios colores y formas, un metro de tul color crema, rosas de seda en dos tamaños, cintas de organza blanca y blanca con dorado, blanca con raso.
 |
| con las flores se les suma alambre y se envuelven en cinta de floristería blanca. |
 |
| del mismo modo que hacemos con las flores hacemos lazos impares con las cintas y las unimos a un alambre y lo recubrimos con cinta de florista, |
 |
| se debe incluir varios tipos de cintas tanto de raso como de organza , este ramo en particular llevo unos 5 tipos distintos de cintas en diferentes tonos de rosa y marfil. |
 |
| acá podemos ver las distintas flores lazos y moños de tul los cuales son cuatro tiras de tul de 4cm por 10cm de largo unidos juntos y doblados al medio unidos con un alambre que luego se recubre como los anteriores. |
 |
| así nos queda el ramo junto a las cuentas que están unidas al alambre dorado sin encintar le damos una forma armoniosa en este caso particular la novia lo quería circular, los cabos los unimos con cinta de floristería y luego lo forramos con cinta de raso a tono tratando de dejar todo el cabo parejo y suave. |

 |
| en la parte posterior del ramo podemos ver el detalle de un moño el cual es un toque divertido y nos facilita el remate del mismo. |

Para aprovechar estos días de frió algo para hacer en casa.
Acá les dejo la primera de varias entradas de artesanías gratis son de una pagina que siempre tiene grandes ideas se que esta en ingles pero las instrucciones son simples y esta muy bien ilustradas que casi les diría no precisan conocer del tema.
De igual forma les digo que si quieren que les de en español las instrucciones no hay drama me las piden y se las envió.

Pincha aquí para obtener moldes gratis.


De igual forma les digo que si quieren que les de en español las instrucciones no hay drama me las piden y se las envió.
Pincha aquí para obtener moldes gratis.
We provide a pattern download that gives you the perfect wedge shape to create the pinwheel design of this pillow. You can easily cut two wedges from each 10" x 10" Layer Cake square, which means you'll use just six Layer Cake squares for this project. Or... spread your creativity around to friends and family, and make SEVEN pretty pillows from the 42 squares in a standard Layer Cake pack. I'd say that's quite enough for a grand scale pillow fight.
All of our Fresh Linens projects started out with pre-cuts, thanks to our friends at Moda Fabrics who provided us with a full set of all the pre-cuts available for Joanna Figueroa's beautiful Fresh Cottons collection.
This collection of fabric has a softly nostalgic feel, but there's nothing old-fashioned about it. That's one of the magical things about Joanna's designs; she pulls in wonderfully vintage themes and colors but the result is never dowdy or out-of date. In fact, they are always new and fresh and fun. To learn more about Fresh Cottons, pre-cuts and our nine Fresh Linens bedroom projects, read our article, Fresh Linens Liven up a Guest Bedroom with Crisp, Comfy Color.
Sewing Tools You Need
- Any Sewing Machine (we recommend the Janome 3160QDC)
- ¼" foot (optional)
- Zipper foot - narrow base or regular
Fabric and Other Supplies
- Layer Cake Pack (we used just six 10" x 10" squares from the standard 42-piece pack; if you choose not to use a Layer Cake, you'll need to cut six 10" x 10" squares): we used Joanna's Figueroa's Fresh Cottons Layer Cake by Fig Tree Quilts for Moda Fabrics
- Jelly Roll (we used one 2½" x 44" jelly roll strip from the standard 40-piece pack; if you choose not to use a Jelly Roll, you'll need to cut one 2½" x 44" strip): we used Joanna Figueroa's Fresh Cottons Jelly Roll by Fig Tree Quilts for Moda Fabrics
- All purpose thread to match fabrics
- Button or carpet thread (optional, for sewing on buttons)
- See-through ruler
- Iron and ironing board
- Scissors or rotary cutter and mat
- Fabric pen or pencil
- Straight pins
- Tape measure
- See-through ruler
- 1 yard of ¼" cotton cording
- 1½” covered button kit (you'll need two buttons, most kits come with 3 or more)
- Hand sewing needle
- Curved needle (optional, for sewing on buttons)
- Tracing paper, pattern paper or template plastic
- One small bag of Fairfield Poly-fil fiberfill
Getting Started
- Download and print our Wedge Pattern.
IMPORTANT: This pattern is ONE 8.5" x 11" sheet. You must print the PDF file at 100%. DO NOT SCALE to fit the page. - Cut out the wedge pattern and trace it onto pattern paper or plastic template. Remember to mark the grainline.
- Using your pattern paper/plastic template wedge pattern, cut out two wedge shapes from each Layer Cake 10" x 10" square for a total of 12 wedges. Be sure to watch the direction of your fabric. Your pieces will have some stretch to them, so handle each one with care to retain its shape.
NOTE: You can trace the pattern on the wrong side of each Layer Cake square, or you can make two patterns to make your cutting go faster.

At Your Sewing Machine & Ironing Board
- Arrange your layout for the pillow so you have four sets of three wedges. This is how you will sew them together. The front and back of our pillow is identical, which was the most efficient use of the Layer Cake squares. If you're not worried about fabric waste, you could select up to 12 different fabrics. Again, remember to handle the pieces with care due to the bias stretch.
- Select two wedge shapes from your first set of three. Place them right sides together. Pin along one side.
- Using a ¼" seam allowance, sew the pie shapes together along one side. Press seam open.
NOTE: Since Janome is our signature sponsor, we have the pleasure of using their wonderful machines in our studios. For this project, we used the their ¼" foot. It enabled us to keep our seams even, which is important with this type of precision-matching project. - Select two wedge shapes from your second set of three. Align, pin and stitch as described above. Press seam open.
- In the same manner, sew the third wedge shape, from the first set, onto the first pair. Press the seam open.
- And... you guessed it... sew the third wedge shape, from the second set, onto the second pair.
- Now, sew each side together down the center to complete the circle shape.
- Repeat for remaining two sets of wedge shapes to create the circle for the opposite side of the pillow.


Piping
- If this is your first time making piping, see our tutorial, How To Make And Attach Your Own Piping.
- Fold and press the jelly roll strip in half lengthwise, wrong sides together.
- Unfold and strip and place the cotton cording along the pressed fold.
- Wrap the fabric around the cord. Pin close to the cording to hold it in place.
- Using a zipper foot, sew close to the cording to create your fabric covered piping.
NOTE: If your sewing machine allows, move the needle all the way to the left. Or, use a narrow base zipper foot so you can get nice and tight against the cording. - Trim the flange (this is the fabric portion that is flat) on the cording to ½".
- Cut a slit into the flange of the piping every 1" or so. This will help it to bend nicely around the circular shape of the pillow. Be sure not to cut into your stitching.
- Hand baste the piping onto one side of the pillow, aligning the raw edges and easing around the circle. Cut back the piping cord to match and overlap to join. Again, if you're new to attaching piping, check out our tutorial for tips on joining and finishing.
- Layer front and back right sides together, matching the seams as you go around. Your piping will be sandwiched in between the layers.
- Using a ½" seam allowance and your zipper foot, sew around the pillow, leaving an opening for turning and stuffing. If you sew with the side of the pillow to which the piping was original basted on top, you can use your basting as a guide to help you stay nice and close to the piping. The zipper foot will also help you keep a tight line of stitching.


Finishing up
- Turn the pillow right side out.
- Cover buttons with coordinating fabric scraps - we used the leftover fabric from cutting out the wedges. If you are new to covering buttons, we have two tutorials, one using Covered Button Kits (what we did here) and one about Making Your Own.
- Stuff the pillow with fiber fill through the opening.
- Thread a hand sewing needle with button or carpet thread. Hand sew one covered button to the pillow front and one to the back. Pull the buttons tight so they create a nice, tufted effect.
- Slip stitch the opening closed.

martes, 21 de mayo de 2013
Para estos días de frió algo rico para la merienda. Churros caseros.
TIRABUZONES receta de la LELA


Aquí pongo los ingredientes de los TIRABUZONES, este dulce tan típico en
mi pueblo ( ya lo cuento en la entrada que he hecho sobre mi pueblo). La receta
es de Manuela Duque Sanchez (LA LELA) de Villanueva de la Reina (JAÉN). Han
salido buenísimos.
He hecho tres presentaciones, en bandeja, individuales y en cajita de
regalo.
Los tirabuzones se enrollan en una caña, pero como yo no tenía compré
en la ferretería unos tubos de acero inox. que son económicos (4€) y están
fenomenal. Voy a intentar conseguir las cañas que son el molde autentico, el de
toda la vida.
Ingredientes:
5 huevos
300 gr de azúcar
500 gr de harina
la ralladura de un limón
1 cucharada (moka) de canela en polvo
Aceite de Oliva Vigen Extra, para freírlos. (EN MI CASO USO DE MAÍZ)
Preparación:
Se baten las claras a punto de nieve, añadiendo el azúcar poco a poco.
Una vez
batidas las claras con el azúcar se añaden las yemas y seguidamente la
raspadura de limón y la canela. Se sigue removiendo la masa y se incorpora muy
poco a poco la harina. Una vez incorporada, se amasa todo bien hasta que dicha
masa se despegue del recipiente que la contiene. En ese momento la masa está
lista para hacer los TIRABUZONES. Antes de hacerlos, la masa ha de
estar en reposo como mínimo dos horas. Transcurrido este tiempo, se cortan
porciones de unos 40 gr, que se lían a la vez que se estiran en las cañas. A
continuación se fríen en una satén con abundante aceite de oliva y se dejan
reposar hasta que se enfríen un poco para poder retirarlos de las cañas.
Para ver esta y otras geniales recetas no olviden visitar el blog de
COCINA CON CATALINA Aqui.
jueves, 2 de mayo de 2013
Molde gratis de blusa manga murcielago del Baul de la costurera.
Hola amigas ha pasado mucho tiempo aca les tengo un obsequio este genial tutorial de el blog EL BAÚL DE LAS COSTURERAS: aca les copio el tutorial o pueden verlopinchando Aquí en verdad les recomiendo que visiten su blog son geniales los consejos de este genial blog.
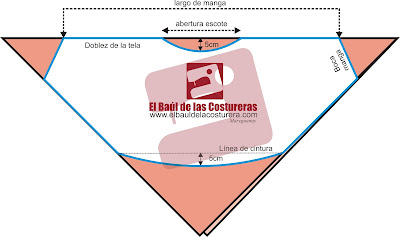
Una blusa con apenas dos uniones de costura en las mangas. El patrón se puede marcar sobre la misma tela.
Con un paño de tela de 150 cm x 150 cm doblado formando un triángulo.
El dobles de la tela será nuestros hombros.
La foto que se presenta es referencial tomada de la web y en su página pueden ver varias opciones sobre este modelo.
PRECAUCIÓN: La prenda quedará cortada al bies por lo que tendrás que colocar en el escote, boca mangas y dobladillo, cinta termoadhesiva para evitar que se deformen.
Medidas necesarias
Abertura de escote: Ubica la articulación del hombro y brazo y mide de extremo a extremo.

Medida de manga: Con ayuda de otra persona extiende los brazos y toma la medida de muñeca a muñeca, o el largo deseado a 3/4 del brazo.

Sobre el triángulo formado con la tela marca el centro y a ambos lados
lleva la medida 1/2 de abertura de escote y mitad de medida de manga.
Del centro baja 5 cm para dar curvatura al escote y del mismo centro
baja la medida del Talle Delantero y traza una perpendicular a ese punto
para la linea de cintura.

En el centro de la línea de cintura baja 5 cm y traza una suave curva.

- Unir por los cantos en diagonal, con lo cual se formarán las mangas.
- Hacer un dobladillo de 1,5cm en las boca mangas y dobladillo.
- Una alternativa para darle un estilo diferente, es colocar elástico en las mangas.
- En el escote, puede ribetear con sesgo hecho de la misma tela.

Suscribirse a:
Entradas (Atom)